Monday, January 25, 2010

Classic

Black Sesame Macaroon

I’ve often wondered how I would look at food and pastry had I ended up going to culinary school. I certainly don’t regret my decision not to go; I often tell myself that everything one learns in culinary school, one can also learn on the job, yet I’m not entirely convinced I believe that. At the very least, culinary schools force you to be exposed to things that you might not otherwise encounter.

Mignardises (Meen-YAR- deez), as a whole, are something that one doesn’t often find in most restaurants. Taken from the Old French word “mignard,” meaning something small or delicate, mignardises are bite-sized desserts that are served at the very end of a meal. Think of them as dessert number two (or three… or four. I suppose it depends where you go). Some typical mignardises would be chocolates, cookies, or candies: pretty much any little confection one could enjoy with coffee. As I said, they don’t often get much play in a lot of restaurants today (especially in the Boulder area), which is a shame, because it gives the diner an opportunity to experience a wider variety of flavors and textures than any single dessert can provide.

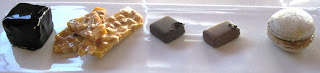
I decided to do a mignardise plate at Jianken, to change things up a little, and also to sneak in some shameless self-promotion. Besides, ever since I stumbled across this video on the interwebs, I have been looking for an excuse to make macarons.


Macarons are one o
f those quintessential French confections that are not given the credit they deserve in the American foodscape. While there’s some debate as to their origins, most people believe that the macaron came about sometime during the 16th century, most likely brought from Italy. In its simplest form, a macaron (note: one “o” not two. Macaroons are entirely different) is just almond flour, egg whites, and sugar, baked together. The ratio of sugar to almonds and sugar to egg whites will effect the end product; more sugar produces a chewier macaron, less makes a crispier one. I had never made a macaron prior to this, and ended up having to do a lot of research before I felt confident to try a batch of my own.

Black Sesame Macaron

Yield ~ 50

190g egg whites, at room temperature

250g sugar

100g water

40g black sesame powder

235g almond flower

230 confectioners sugar

1) Add egg whites to stand mixer with wisk attachment. Start on med-low speed.

2) In a saucepan, combine sugar and water, and cook to 240°f (soft ball stage)

3) Increase mixer speed to medium and slowly stream in the cooked sugar, trying to pour between the bowl and the wisk so as not to fling the sugar around the bowl

4) Whip until the meringue has cooled and forms still peaks

5) Sift together dry ingredients

6) In three stages, fold the meringue into the dry ingredients until homogenous

7) pipe 3cm circles onto parchment, allowing room for expansion

8) allow to dry for a minimum of 30 minutes at room temperature

9) bake at 400°f for 11 min, or until done.

10) cool, remove from parchment, and sandwich two together with about a teaspoon of yuzu curd

It took a couple attempts to get a batch that I was happy with. For having so few ingredients, macarons are tricky things to get right. I just need to do it a few thousand more time and I will be as good as the guy in the video.

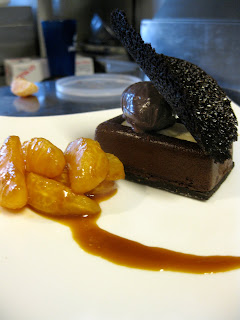
As for the rest of the plate, I went with some old stand bys, just in case the macarons never turned out. Glazed caramel cake, earl grey and lavender bon bons, and peanut brittle. Classic.

Who knows. One of these days, I may even try my hand at entremets…


Saturday, January 9, 2010

Copycat


A lot of chefs seem to like to refer to the craft as an art. It’s a nice thought: something so simple and necessary as food turned into an expression of ones self and ones feelings. Nice, and yet for the most part, I disagree. While there certainly chefs who one could call artists, and for whom food is an expression of the soul, I like to think of us more as the marketing department. You know you need to eat, but our job is to convince you to eat (and generally pay) for the food we make for you. The refined plating and complexity are just a way to make our product stand out… like packaging.

Thinking of food as art does have its advantages, though, because it allows us to do something that a marketing VP generally cannot: Shamelessly steal ideas.

The first seeds of this dessert were planted when they had a chocolate savarin on the menu at D Bar. I remember trying to take the recipe back home to fiddle with it, but didn’t ever manage to get the texture right. It wasn’t until I found a similar recipe on the Callebaut website that I decided to give it another go.

The basic principle behind the Savarin Moelleux is a mousse that is slightly baked, both to give it [some] structural stability and to prevent any possibility of salmonella. What you get is a mousse that is firm enough to hold its shape, but is airy and light on the palate.

Savarin Moelleux adapted from Alexandre Bourdeaux

Yield: ~750g

100g butter

250g Dark Chocolate

100g egg yolks

225g egg whites

50g sugar

pinch salt

1) Combine butter and chocolate and melt

2) Whip egg whites on medium speed.

3) Slowly add sugar and salt into egg whites and whip to medium peaks

4) Add yolks to chocolate mixture and emulsify

5) Fold egg whites into chocolate mixture thoroughly.

6) Dispense into flexipans and freeze solid (about 4 hours).

7) Bake at 425° for 6-10 min, rotating once

8) Return to freezer and freeze solid (about 5 hours)

9) Unmold, and allow to thaw.


A couple caveats: Freezing the mix ensures that they won’t soufflé up during baking. If they begin to rise, they are most likely over baked. If you get impatient, and try to unmold them before they are completely frozen, you risk breaking the pieces.

With this as the center of the dish, the rest of the dessert just seemed to fall into place. I filled the well in the top of the savarin with a white chocolate and crème fraiche ganache. A quenelle of orange chocolate creameux, and a lacey chocolate tuile on top to add crunch.

Thinking of winter desserts, it is hard to ignore citrus fruits, which are coming into their peak right now. While at the store, I picked up a bag of clementines thinking that I would give them a try and see how they were. To my excitement, they were exactly how I like them. They were tart, but sweet, with little pith and a nice thin membrane. The acid would do wonders to cut the thick fats of the chocolate and cream.

After eating one or two (or five), I realized that if I didn’t do something with them soon, there wouldn’t be any left for the dessert. I took a gamble, and let the segmented clementines soak in strong brewed earl grey tea. Earl grey is fermented with bergamot, a variety of bitter orange, and so is the natural choice for citrus applications. After about four hours in the earl grey, I drained the segments and popped one into my mouth. The initial taste was very earl grey, but as I bit down discovered that the membrane of the celemetines had absorbed the earl grey, but it hadn’t penetrated into the rest of the fruit. The meat was still bright and clean. I’m so happy with this technique, I might always use it from now on. The other benefit of the soak is that it will prevent the segments from drying out over time.

Finally, I took the left over earl grey “marinade” and added it to about half its amount of orange juice and reduced it down to a sauce consistency.

Wednesday, January 6, 2010

Pear

Happy New Year! Again, it has been longer than I would like since my last past, and as a result, one of my resolutions is to pick back up the pace of my posts to at least once a week.

Note: For some reason, the pictures I took of this dessert seem to be missing. Instead of putting off posting, I decided to go ahead, and I will add the pictures in later.

I decided to celebrate the end of fall with a pear dessert since pears are really only worth eating in the fall. I have a bit of a love/hate relationship with pears. When they’re good, they’re great. It’s really easy, however, to get pears that are either too soft, or too mealy. My approach to the dessert was three different pears five different ways.

The focal point of the of the dessert is the sake poached bosc pear. Bosc pears are good for poaching because they don’t let go of their water as much as many other varieties, so they don’t shrink during the cooking process. I took a bit of a gamble by poaching them in sake as opposed to wine, because despite the fact that sake is called “rice wine,” the flavor it brings is far different. The result, happily, was a pear that kept its delicate flavor, while picking up some of the dryness of the sake.

For the second iteration of pear, I took the poaching liquid from the pears, reduced it down, and made a caramel out of it by adding some extra sugar, bringing it up to around 320°, and adding scalded cream and sake to make a complex caramel sauce that has a strong taste of sake and also a slight fruitiness that is distinctly pear.

The third variety of pear is a pear galette, which is simply puff pastry, topped with sliced pear, brushed with butter and sprinkled with sugar. When they bake, the pears –bartlet this time—wilt down a little bit, but keep all of their flavor. I chose bartlet pears for the galette because I think they have the fullest flavor, and are [fairly] consistent.

The fourth preparation for the pears is another taken from the pages of Keegan Gerhard: a sweet-and-sour roasted pear (though I don’t know if he would necessarily describe it that way). For this I used the little Forelle pears, which taste similar to a bartlet, but are only about a third the size, and made sure that they were a little on the hard side. I roasted them in palm sugar and butter in a 300ish oven, cored and skin on, but with a few slits poked in the sides, moving them around the pan every 20 minutes or so. After about an hour and a half, I added a sprinkle of yuzu juice, to add that distinct tartness.

The final style of pear is a simple pear chip (you will notice that it is missing in the picture). To make the chips, I took the left over Bartlett pears, sliced them very thinly, and lay them out on a silpat. They dry out in a low oven (150°) for 2-3 hours, and then are ready to go.

Of course, in keeping with my obsession over brown butter, the dessert wouldn’t be complete without the addition of a scoop of brown butter ice cream.