Monday, August 16, 2010

Inedible

I found myself watching Food Network the other day. The theme of the episode was “Dinner Date at Home,” and the hostess was making restaurant-style food for a hypothetical dinner date for half the cost of a night out. “The difference”, she was saying, “between a regular meal and one at a restaurant is the presentation. A sprinkle of powdered sugar and a sprig of mint can take your food from ordinary to extraordinary.” She then placed a pretty little mint top in the center of the cake and presented it to the camera.

The meal looked great, and probably tasted delicious, but that dessert—that sprig of mint—stuck out at me like a sore thumb. For so long in the restaurant world, every dish came with the ubiquitous parsley top, mint garnish, lemon wheel or dusting of chili powder. If you’ve ever made the mistake of eating one of these garnishes, you probably realized that they add nothing to the dish. In fact most of the time they are downright inedible. So why keep them?

In a sushi restaurant, sasa—bamboo leaf—is the equivalent of the mint top. Bamboo leafs, along with wasabi and pickled ginger, have some antiseptic properties, making them an antiquated way of fighting food-born illness. Of course, that was before refrigeration. So why do we sure them? Wasabi helps to cut the fattiness of certain fish, and pickled ginger is often used as a pallet cleanser. But sasa is completely inedible unless you’re a panda; its only purpose is to add a splash of green to the plate. Thus, I began my quest to find a better use for it.

The sushi chefs keep a container of sasa leaves submerged in water to keep the leaves from drying out and becoming brittle. I noticed one day while I was changing the water that the water had taken on a very sweet, almost vanilla smell to it. My first instinct was to treat it like tea, and steep it in cream to see if I could extract some flavor. I added 25g of leaves to 500g of cream and brought it to a simmer, and then hit it with an immersion blender. The cream tasted like something between a vanilla malt and green tea. It was delicious.

With my first attempt, I wanted to keep it simple, so I went with a panna cotta, which would highlight the flavor of the cream. I added a little sugar (about 50g) and just enough gelatin to barely set it. Paired with some fresh Colorado peaches and a little peach sake sorbet, it made for a killer special.

I will have to keep playing with this bamboo idea, but for now I can at least rest easily knowing that those pretty sasa leaves aren’t just for looks.

Wednesday, July 14, 2010

Vogue

Restaurant food, like everything else, has its share of fads and trends. Beef Wellington, vichyssoise and chocolate soufflés are certainly delicious, but they don’t see much action these days, being relegated to that dusty shelf in the back, labeled “old school.”

I don’t know who was the first person to discover the secret to making faux caviar using alginate, but Ferran Adria of El Bulli is credited with being the first to serve it in a restaurant. He and others abandoned the cherished trends of the day and struck out using foams and powders and science to propel their food. Of course, this was more than a decade ago. What started with just a few restaurants has now propagated its way through the food world, changing how we look at what we eat.

My boss bought a caviar making “kit” a few months ago, on a whim. He played with it once or twice, without moderate results, and so soon we both forgot about it, going back to things we were more confident with. It wasn’t until recently that I got the motivation to play around with it again. During a lull in the dinner service, a co-worker and I decided to try making some spheres. I suggested espresso, seeing as I had a coffee-flavored dessert on the brain. In no time, we were brewing espresso, reading and re-reading the vague recipes and instructions, and assembling a caviar-making station.

Sodium alginate is a hydrocolloid; it’s similar to gelatin or agar agar in that it creates a molecular web that suspends water molecules. Unlike gelatin or agar agar, though, it does not need heat in order to be dissolved and dispersed. Instead, it will begin to set in the presence of calcium. To make the caviar, then, it is simply a matter of dripping small drops of a liquid containing the alginate (in my case, the coffee), into a water bath spiked with a little soluble calcium. On contact, the calcium begins to “cook” the coffee mixture, forming a skin around a liquid espresso center. The longer the caviar balls are left in the calcium bath, the thicker the skin will be. Once removed from the calcium bath, the balls get a quick dip in a regular water bath to wash off any calcium that may be hanging around before they are ready to serve.

The texture certainly added something to the final dessert; a Vietnamese Coffee Tart, with Condensed Milk Chantilly, Miso Caramel, and Espresso Caviar. They were like little tapioca pearls that added an extra kick of espresso flavor. It’s not a technique that I plan to use often, but certainly one to keep in the repertoire.

Monday, June 28, 2010

I Scream

I realize that, for the most part, this blog is aimed at people that who know a thing or two about pastry, or at least can afford to invest in cool pastry toys. To be sure, everyone can read and enjoy my literary genius (cough), but even the most avid cooks rarely have silicone baking mats, flexipans, and copious amounts of freezer space dedicated solely to the pursuit of large quantities of high-calorie sweets. I would like to think, though, that even to the uninitiated, there could be some benefit gained from my ramblings.

Given that I work in a restaurant, I think most people (including myself, not long ago) would assume that when, I make ice cream, I use a big, expensive batch freezer, which can churn gallons of the cold stuff at a time. You would be wrong. In fact, for the first year and a half that I spent at Jianken, we didn’t make our own ice creams or sorbets. We bought them.

It wasn’t until I hi-jacked my mom’s machine from their home that I made my first dessert special featuring an ice cream. I did eventually give it back, after having convinced my boss that it was a worthwhile investment. So what did we buy as its replacement?

A Cuisinart IEC-30BC, on sale for $50. That’s pretty cheap, even for a home ice cream maker. The sad and amazing thing is how well it works. Granted, the new ice cream maker can only produce 2 quarts of ice cream at a time, and it takes time to re-freeze the bowl before I can churn another batch. But it works. And, hey, how much ice cream can one sushi bar sell anyway?

The deal with home ice cream makers is that every one is different; whichever you decide to buy, you should follow the manufacturer’s recommendations for the best results. I recommend one like the one that I use. It disassembles easily, which makes it easy to clean, and it is smaller and less expensive than the ones that contain their own freezing unit. I would stay away from the ones that use ice cubes and rock salt as the freezing agent; they just don’t get cold enough.

Point is, even a home cook can afford to make great frozen desserts.

Tuesday, May 18, 2010

Success

My girlfriend’s birthday has come and gone. It’s one of the great ironies of our relationship that in the five years that we have been together, I’ve only made dessert for her a handful of times. So this year, I decided that I would actually make her a cake for once.

Inspired by Fransisco Migoya’s The Modern Café, I wanted to try my hand at another entremet. For those who don’t know, an entremet is a cake… sort of. It can really be made of anything, but it serves the same purpose. Commonly, an entremet will consist of layers of some sort of cake, and typically a mousse of some sort. The idea is to have flavors and textures that complement and contrast each other in one bite. It is like an entire dessert in cake form.

The first thing I did was to decide some flavors I wanted to pair together: Crème fraiche, chocolate, nuts. Chocolate is a great ingredient to use for entremet, because cocoa butter will help stabilize the chocolate components of the cake without having to add a ton of gelatin, which can ruin the texture. I chose to add the crème fraiche because, along with being incredibly delicious on its own, I think it is chocolate’s best friend, and the tanginess helps to cut the richness of the chocolate. The nuts I chose because they are just plain tasty.

What I came up with was a Milk Chocolate Chantilly Cake, Chocolate Jaconde—a thin almond sponge cake, Krispy Chocolate, and Crème Fraiche Crème Brulée.

Building it was relatively easy. I made all the individual components ahead of time, and had them stored in the freezer, ready to go. Assembly was nothing more than piping the mousse into the bottom (which became the top) and sides of the mold, and then stacking the pre-made rings of crème brulée, jaconde, and Krispy chocolate, making sure to add more mousse where needed. After all that was finished, it took another trip to the freezer to get rock hard.

After that came glazing. In retrospect, I think I need a new glaze recipe, because it is too viscous, even at the correct temperature. I ended up with lumps and streaks where it should have been completely smooth. That was ok though, because the chocolate décor covered most of it up.

The most stressful part of the whole process is thawing the cake. After glazing, the cake is pulled out of the freezer and left to thaw overnight. If there wasn’t enough gelatin in the mousse, or if it was over-whipped, or if the crème brulée layer was too soft, the whole thing could collapse in on itself and be just a big pile of stuff in the morning. Luckily the gods were with me, and it stayed stable.

I would call that a success!

Saturday, May 15, 2010

Shiso Tasty


Shiso—like basil, mint, thyme, oregano and sage—belongs to the mint family; and, like all the herbs listed above, it has its own unique flavor. Some people that I work with describe it as being “like mint.” It’s not. It tastes like shiso: a strong, slightly bitter flavor with a little fruitiness at the end. Chances are, if you have ever eaten at a sushi bar, you have probably come across it at some point.

I don’t really like it. It has its place, certainly, with good Uni, or paired with pickled plum, but it isn’t something that I seek out. Other people I know will eat it like it’s popcorn. I suppose my taste buds just aren’t as mature.

It is a hard ingredient to incorporate into a dessert, which is why I havn’t used it thus far. While shopping around the other day, I found strawberries for $1.50 per pound, and knew that it was time to bring strawberries back to the specials menu. It has been a long winter, using the tart, flavorless off-season berries, so I was excited to be able to feature them at the forefront of a dessert. I also knew I had a place to use shiso.

I think people often pair strawberries with basil because they are both in peak season around the same time, and basil is a delicious complement to strawberries. The basil brings a certain spiciness to the party that balances out the strawberries, while it is sweet enough to still feel like a dessert item. Basil, however, doesn’t have much to do with sushi. I wanted to marry the shiso flavor with the strawberries in such a way that it was a major flavor, without masking or over-powering the other components.

Of course, the first thing that jumped to mind was a Strawberry-shiso sorbet. The idea seemed promising enough that I came up with what seemed to be a decent recipe, and tried it out. It was too sweet and the shiso flavor didn’t really come through, but it was worth a second try. After some trial and error, I ended up with a Strawberry, Shiso and Buttermilk Sherbet:

Strawberry+Shiso+Buttermilk Sherbet

Yield: ~ 2 liters

750g Strawberry puree

360g Sugar

400g Buttermilk

50g Water

5-6ea Shiso Leaves, washed and picked

1) Warm buttermilk just enough to completely dissolve the sugar

2) Combine all ingredients, thoroughly blend, and pass through a fine mesh sieve

3) Allow to chill in the refrigerator until it reaches 40°F or below

4) Process in an ice cream machine and allow to harden in the freezer for at least 2 hours

That was a good start. By this point, I had most of my dessert worked out. I was going to do a play on strawberry shortcake, with the sherbet, some macerated strawberries, and buttermilk biscuits, but it needed something more.

It was the perfect time for me to use another ingredient that I have been waiting for the opportunity to use. Soy lecithin, among other things, is really good at making foams. It can simply be added to a liquid and then frothed with an immersion blender or other frothing device, and you have foam. The beauty of the foams are that they can add a lot of flavor without adding a lot more “stuff” to eat. At the end of a meal, you should still be able to finish your dessert without feeling like you’re going to explode. Foams can pack a lot of flavor into literally no bites. As an added bonus, the shiso and buttermilk foam added a nice splash of green and an extra hit of shiso to the plate.


Thursday, April 29, 2010

Not just for breakfast anymore...

Waffles. Of all the breakfast foods—other than Dutch Babies, which hold a special and artery-clogging place in my heart—waffles would be my favorite. Sure, I eat more French toast, but that’s because I always have stale bread lying around, and its quick to make, but waffles; waffles are king.

In America, we treat them as a breakfast-only item, but other places in the world sees it differently. In Belgium, one can find waffles in little street carts, with pearl sugar added to the batter so that it caramelizes as the waffle cooks. A similar sweet street food can be found in Hong Kong, topped with sweetened condensed milk. What makes waffles so good? I have no idea. What makes a good waffle? That is a different question entirely.

The first secret to making a good waffle is in the waffle iron. The whole idea behind a waffle iron is that the checkerboard pattern greatly increases the surface-area that is in contact with the hot metal. The result is something that cooks much more quickly, and a finished product that is crispy. If you are using an American waffle iron (the kind with the really small squares), you can make a half-decent waffle, but the deep Belgian style waffle iron is really the only way to go if you want a great waffle.

The next point, as important as the first, is that waffles are not pancakes, they are waffles. It sounds simple, but more than once, I have run into people who think that a waffle is nothing more than a square pancake. Its not. Pancakes are, well, cakes: soft, moist, and spongy. Waffles should be crispy on the outside, and soft on the inside—almost more like toast. Waffle batter is much stiffer than pancake. It can be leavened with baking soda, like a pancake, but most good recipes use other means to make the batter rise.

My method is one that uses yeast. The yeast gives a very distinct flavor, and also a… well… yeastiness.. I’ve had good luck with this recipe. They are good as sweet waffles, but you could just as easily top them with some fried chicken. I found that they even freeze better than other recipes that I’ve tried.

Yeasted Waffles

Yield: ~15 Belgian style waffles

12oz Milk

4oz Butter

2.5oz Sugar

3/4t. Salt

2ea eggs, separated

2c flour

1½t. instant dry yeast

1) Combine milk and butter and microwave until hot (Not boiling. Like 150°ish)

2) Combine dry ingredients except for sugar and sift

3) Add milk/butter mixture to dry, followed by egg yolks.

4) In a separate bowl, wisk egg whites, slowly incorporating the sugar, until they reach soft peaks

5) Fold egg whites into batter.

6) Pour into a large bowl or other container (batter will expand substantially).

7) Allow to rise for an hour at room temperature. At this point they can be cooked, or placed in the fridge for up to another 24 hrs.

8) Add roughly a 1/3 cup scoop to hot waffle iron and cook until golden

I made the waffles chocolate simply by substituting about ¼ cup of flour for an equal amount of cocoa powder. In truth, even with all the cocoa powder, the waffles didn’t taste that chocolaty, but it was enough.

The inspiration behind the dessert was bananas, chocolate, and peanut. I decided to top the waffle with some bruléed bananas (by far my favorite way to treat a banana), and peanut butter ice cream and a little chocolate lace (not pictured), to add crunch and that extra chocolatiness. People liked it so much I ended up running it two weekends in a row!

Saturday, April 17, 2010

Work in Progress

So this is my first attempt at “Entremets.” I’m not necessarily posting this as something to strive towards, but as a starting point.

One could think of an entremet as a cake, and they would be sort of right. I think of it more as a dessert that you eat by the slice. The shape can be similar (in this case, a standard, 10” round), but what it is made of can be very different. A good entremet should be many layers of contrasting textures and/or flavors that complement each other; sort of like getting a little bit of everything in a single spoonful.

For this attempt, my flavors were a little on the tropical side: banana, coconut, caramel. Layers of banana bread and caramel sauce, suspended in coconut bavaroise (mousse). It was then covered in a white chocolate glaze and colored white chocolate décor.

If I were to give it a rating, I would give it a 6/10. Not bad for a first attempt, but could use some improvement. Among other things, it needed some crunch and was a little too sweet. I also wish that the layers were a little more visibly distinct. But it was good, and the other people that ate it had great thing to say about it.

As I said, it’s a work in progress.

Monday, April 12, 2010

Stroke of Genius

It’s been a long time since I’ve made a post, for a few reasons. Firstly, my camera has been elsewhere, which really put a damper on my posting possibilities. Also, I have been relatively busy outside of work. Mostly, though, I haven’t posted in a while because I didn’t really have anything worthy of posting.

As I mentioned before, Jianken is in the midst of trying to update their menus, which are in great need of an update. My goal for the dessert portion of the menu is to make it one that has more to do with sushi and Asian cuisine. For the past few months, I have been playing with new ideas and flavors that might fit the new menu, but lately it’s felt like I’ve hit a wall: redundancy. I need a new flavor; a new idea; a new technique. Something. That’s when the light bulb went off:

Calpico ice cream. The girlfriend and I were cleaning out our fridge at home and discovered that there was a bottle sitting in there from a visit to the Asian market. For those who have never tried Calpico, also known as Calpis, it is a non-carbonated soft drink that is made from fermented dry milk. It is sweet and tangy like yogurt, but with its own distinctive flavor. What is even better is that Calpis is a uniquely Japanese product. It was first produced in 1919, and gained wide popularity because in its concentrated form it doesn’t need to be refrigerated. Calpis is as prevalent in Japan as Coke, or Kool-aide is in the US.


At first, I planned on making a Calpis sorbet. I have seen it as a shaved ice flavor, and figured that sorbet would be the next logical step, but I found that in order to keep the sorbet smooth once churned, the product had to be cloyingly sweet. It needed some fat to tone down the harshness of the calpis.

What I ended up with is technically an ice-milk. Ice-milk (at least how I define it), is a frozen dessert that is churned like ice cream or sorbet, but unlike ice cream, it contains no eggs and is thus not a custard. Ice-milk should ideally be less than 10% total milk fat. It has a texture that is more similar to sherbet or sorbet than ice cream. The crème fraiche in the recipe rounds out the flavor a bit more.

Calpis Ice Milk

Yield: ~ 1 liter

75g Sugar

50g Glucose powder*

550g Milk

250g Calpis

140g Crème Fraiche

2sht Gelatin°

*Glucose powder can be substituted for an equal amount of regular sugar with similar results

°Gelatin is optional

1) Combine Sugar, glucose powder (see note), and 100g milk in a small sauce pot and heat until sugar is dissolved and the milk is starting to steam.

2) Hydrate gelatin, squeeze out the excess water, and add to milk mixture.

3) Combine the remaining ingredients and homogenize with an immersion blender or wisk

4) Allow to cool for at least 4 hours in the fridge before

5) Process in ice cream according to manufacturers’ instructions

6) Allow to harden in freezer for at least 2 hours

I have found that I like the combination of bitter and acid, so I tend to pair things like dark chocolate and oranges, so it seemed natural to pair this with bitter matcha. Matcha rice pudding, Calpis ice-milk, and stewed cherries with brandy. Of course, its not cherry season, or they would be fresh cherries, but I did find a frozen product that was still remarkably sweet and full-flavored.


Wednesday, February 24, 2010

V-Day


For the restaurant industry, there is always a lull in business between New Years and the beginning of spring. It’s the time where you see most restaurants tightening their belts, cutting labor costs, and spending less wherever possible. It’s also the time when many restaurants go under. Between the normal expenditures and taxes that are due, even diligent owners can find themselves with the painful realization that their product isn’t selling.

Valentines Day, our favorite Hallmark holiday, is highly anticipated in the restaurant community, because it is a night where one can be certain that the numbers will be good. While it doesn’t do a whole lot in the long run for a restaurants financials, it does provide much-needed morale to employees who are generally bored. Finally, we get to make something different. Finally we get to serve something exciting. At least, that’s the theory…

If there’s something that I’ve discovered in researching for this particular dessert, it’s that people tend to play it safe on v-day. Whether they know it or not, I think people tend to stick to things that they are certain are going to taste good. No matter how good the apples look right now, no matter how extravagant the preparation, it won’t sell. Customers look to the night’s dessert with only one real question: is it chocolate?

Chocolate’s power as an aphrodisiac is debatable at best, but I can’t deny that it satisfies something deep in the soul. Like wine, where you get your chocolate from will greatly affect its flavor. The climate, or terrior as wine aficionados would call it, and how the beans are roasted give an unimaginable range of flavors: from smokey and bitter, or tart and fruity, to sweet with hints of caramel.

I could go on at length about chocolate production, but I think I’ll save that for another post. Books and books have been written on the subject, and there’s still more out there yet to be uncovered. For the moment, I think I will just give you a couple of my thoughts on choosing and eating chocolate:

· Know what you’re buying. Chocolate is expensive. Good chocolate should be [relatively] expensive. Spending money on Hershey’s is like buying non-alcoholic Keystone Light. It’s just not worth it. I’m not saying that you should be unloading your next paycheck for one bar, but go out on a limb and reach for the upper shelf occasionally.

· Don’t count out milk and white chocolate. Many adults claim that milk and white chocolate are for kids who’s taste buds haven’t’ developed yet. Shut up. Anyone who’s had a great milk chocolate can tell you that it is a life-changing experience. A good milk chocolate should let you taste the cocoa bean as much as a dark should.

· Take the percentages that chocolate maker’s proudly display with a grain of salt. They can be very misleading, and are not the mark of what makes chocolate great. All that little number means is how much of that bar is cacao, and how much is not. Two chocolates that are labeled as 64% can taste vastly different. The only time a use those is as a way to differentiate between chocolates that one company makes, since they are rarely given other names.

· Some brands I tend to like: Voges, Sharffen berger, El Rey, Valrhona (though it’s given more credit than it is due), and Callebaut

· Some brands I tend to stay away from: Hershey’s, Lindt, Ghiradelli

These are, of course, my own opinion. I’m not going to come to your house and throw out all of the bad chocolate. In fact, I’m sure I have stashed away somewhere a couple Hershey’s bars from my last camping trip. Does that make me a hypocrite? Probably. Depends on whom you talk to.


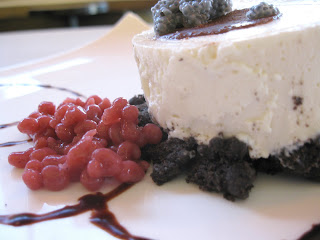
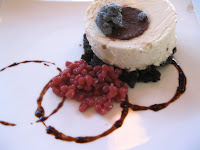
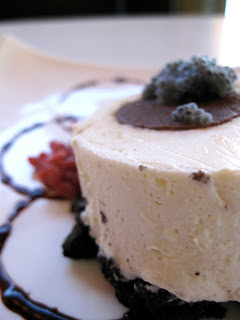
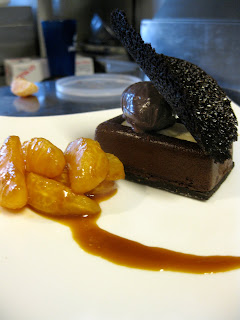
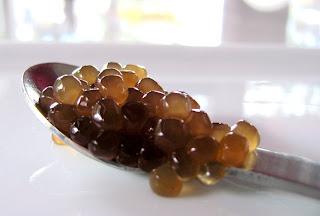
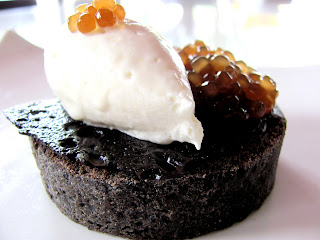
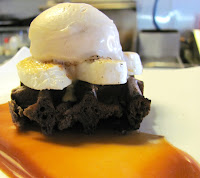
As for the much-anticipated Valentines dessert, I decided to stick with something that most people could identify with. I took my inspiration from a hazelnut laté, and deconstructed it.

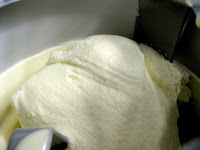
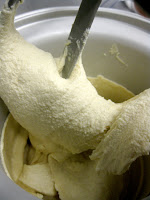
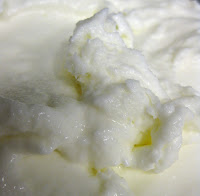
For the coffee part, I made an espresso semifreddo. Semifreddo literally means “half frozen,” but it really refers to a frozen mousse, of sorts, that has had so much air incorporated into it prior to freezing that it never gets completely solid. I simply whipped my espresso infused cream, whipped my egg yolks, and whipped my egg whites and gently folded them all together depositing into a flexipan and freezing.

For the first chocolate component of the plate, I made a pudding cake. Pudding cake, like French toast, is a great way to use up a product that would otherwise be thrown away. I had some leftover chocolate almond cake from a previous dessert. They were odd shaped pieces, some of which had dried out, but still tasted wonderful. To make the pudding cake, I made a custard of egg yolks, cream, sugar and chocolate, and then added the leftover cake, mixing until the pieces had broken up into a homogenous mass. They were then baked and allowed to cool in the freezer before cutting into little rectangles. They would be warmed to order, which would contrast nicely with the cold semifreddo.

The hazelnut component was the chocolate-hazelnut gelato that I froze into little cylinders. I topped the semifreddo with a toasted marshmallow at the behest of my girlfriend—who was kind enough to not be mad at me when I had to spend v-day with the restaurant instead of her, and finished the plate with some cocoa nib lace that provided the much-needed crunch.

I don’t have any recipes this week, but I do have some promising ideas.

Monday, February 15, 2010

Pistachio? Pistachio!

Whenever I swing by my parent’s house, there is a bowl sitting out in their living room filled with roasted, salted pistachios. I can plop myself down in a chair and blow through a handful of the little nuts before I even notice. For some reason, though, I have a certain disconnect with the salty little morsels in the bowl on their coffee table, and the nut so often used in European pastry.Pistachio Financier

It’s amazing to me that pistachios aren’t a bigger part of the American identity. We produce a lot of them. As of 2005, we were a close second to Iran in production, the majority of which comes from California. The nut, which is actually a drupe, originated in the Middle East, and was introduces to the United States in 1904. It thrives in airid climates, making places such as Iran, the Mediterranean, and southwest US ideal places for pistachios to grow.

Pistachios have a wonderful fruity flavor that is very well suited to sweet applications. While in the US they are generally bought, shell-on and roasted, for consumption as a snack food, there are occasionally places that sell them raw. If you can’t find them in a local store, there are plenty of internet sources that sell them.

Financiers (pronounced Fee-Nan-See-Ay) are another of those French confections that have fallen by the wayside of modern pastry. They are little cakes, generally made with almond flour, egg whites, sugar, and my favorite ingredient of all time: brown butter. Traditionally, they would be baked in little rectangular molds that would make them look like little gold ingots, hence the name financier. The cakes that ensue are enigmatic: light but chewy, airy but moist. Like the macaron, they are something that one can easily get hooked on.

As I said, financiers are traditionally made with almonds, but I don’t see any reason why one couldn’t use another nut in their place. A quick search through Google, and I found that I’m not alone. The only snafu I had was that I needed to make my own pistachio flour. In the end, it may be something that is worth buying pre-ground. In order to get the pistachios ground finely enough, I put them in a food processor to get them roughly ground, and then spread them out on a baking sheet in a LOW oven to dehydrate them for about 6 hours. I then put them in the freezer to get them rock hard before finally mixing them with 50% of the weight of sugar and putting them to the food processor one more time… As I said, it may be worth the investment to just buy the flour pre-ground. In terms of molds, you can certainly find financier molds, but its not strictly necessary. I used a flexipan with diamond shaped cavities, and was happy with the result. Also, mini muffin pans would work well.

Pistachio Financier adapted from Stephane Glacier M.O.F


Yield~ 30 cakes

250g Butter

300g Powdered Sugar

150g Pistachio Flour*

260g Egg whites

100g Flour

25g Honey

*If you are making your own, subtract the sugar added during grinding from the total sugar amount

1) Place butter in a small sauce pot over medium heat and brown until golden and nutty-smelling.

2) Add the honey to butter mixture and allow to cool

3) Sift together dry ingredients

4) Whip egg whites to soft peaks

5) Fold in the dry ingredients, followed by the browned butter

6) Place in piping bag and pipe into molds that have been sprayed with baking spray.

7) Bake at 400° for 12-15 minutes, rotating one in between

Coconut Rice Pudding, Pistachio Financier, Banana-pineapple Sorbet
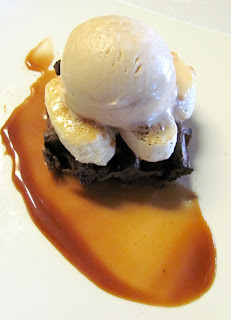
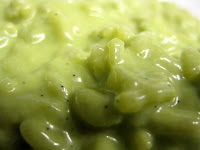
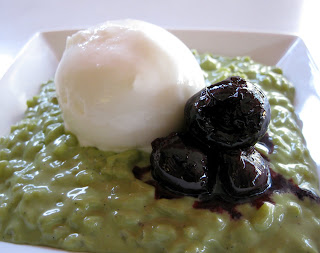
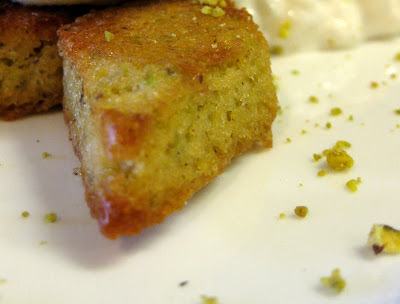
What would go with pistachio financiers? Well, anything. In fact, it was only sheer willpower that kept me from eating the entire batch. Of course, they would be delicious with a cup of tea, such as Earl Grey, or English Breakfast. They also would be good dipped in chocolate or served with preserves. For me, I used them to sop up the remnants of a tasty coconut rice pudding with a scoop of banana-pineapple sorbet.

Saturday, February 6, 2010

Rough

I debated with myself a lot on whether or not to share this dessert. Its not that I have some personal interest in keeping the recipe secret, I just think the final plate ended up a less-then-perfect specimen of a plated dessert. Normally in this case, I would just forget about it and wait until I had something worth posting, but after some reflection, I have decided that there were strong elements about the dessert that I liked and which were worth sharing.
Tofu Cheesecake

As I have mentioned before, I don’t really like cheesecake. Blasphemy to many, I know. Get over it. Of course, I understand that other people like it, so from time to time I will throw one out there. Given this most recent cheesecake episode, I’m almost inclined to think that as long as you call it cheesecake, it doesn’t matter how ill-fashioned the dessert is: people fall on it like a pack of hungry wolves. It could taste like sawdust, and most people wouldn’t say a thing about it. After all, its cheesecake. How could it be bad? Not an inspiring thought.

I received, as either a Christmas or birthday gift, The Sweet Spot by Pichet Ong. It’s a book that I highly recommend, especially for anyone trying to make desserts in a sushi restaurant. While not limited only to Japanese sweets, it is a book of sweets, from cookies to custards, which have Asian influenced flavors and techniques. It was here that I was first introduced to the Tofu Cheesecake.

Tofu Cheesecake

As Pichet explains, Cheesecake is becoming almost as popular to the Japanese as it is to Americans. Presumably, someone Japanese cook discovered that by replacing the heavy cream cheese with tofu, the cheesecake could be made lighter. “Over time,” Ong explains “it has become something of a nouveau national dessert in Japan. The dairy-free, no-bake cheesecakes and perfect for a mostly lactose-intolerant population who, for the most part, don’t have ovens.”

Tofu Cheesecake adapted from Pichet Ong

Yield: ~1 9-inch cheesecake, or 10 individual ones

19oz silken tofu

2t Yuzu juice*

4oz Heavy cream

1t salt

5 sheets or 2¼t gelatin

2oz water

12oz cream cheese, room temperature

5½ oz sugar

*Lemon juice can be substituted for yuzu


1) Place tofu and yuzu in blander and blend until smooth

2) Hydrate gelatin in the water

3) Combine cream and salt, and scald

4) Add gelatin to cream and stir to dissolve. Combine with tofu mixture

5) Add cream and sugar to an electric mixer with paddle attachment and cream until light and fluffy

6) Slowly incorporate the tofu/cream mixture until homogenous

7) Pour over prepared crust or into individually prepared ring molds

As you can see, the recipe still calls for cream cheese because it really isn’t cheesecake without that dense, tangy richness. As it is, it tastes like tofu… but in a good way.

Tofu Cheesecake

I took the plain tofu cheesecake base, and poured it into ring molds and deposited a round of ganache in the bottom. Instead of the standard graham cracker crust (which I hate), I decided to do something a little different by sitting the cheesecake atop a cocoa nib crumble. To add a citrus pop, I topped the cheesecake with some basil seeds hydrated in sweetened yuzu juice. Lastly, the quintessential strawberries, this time in the form of strawberry pearls.

As I said, most of the components were delicious, but the plate was amateur. It looked a little jumbled together. If I were to do it again, I would probably change a few things:

1) The cheesecakes should have been molded and tamped better, to remove the air bubbles. It might not seem like a big deal, but it is.

2) Get rid of the basil seeds. I love basil seeds, but this was the wrong application.

3) Crumble the “crust” into smaller pieces, so that the cheesecake would stay level.

4) Change the plating… it looks messy

Monday, January 25, 2010

Classic

Black Sesame Macaroon

I’ve often wondered how I would look at food and pastry had I ended up going to culinary school. I certainly don’t regret my decision not to go; I often tell myself that everything one learns in culinary school, one can also learn on the job, yet I’m not entirely convinced I believe that. At the very least, culinary schools force you to be exposed to things that you might not otherwise encounter.

Mignardises (Meen-YAR- deez), as a whole, are something that one doesn’t often find in most restaurants. Taken from the Old French word “mignard,” meaning something small or delicate, mignardises are bite-sized desserts that are served at the very end of a meal. Think of them as dessert number two (or three… or four. I suppose it depends where you go). Some typical mignardises would be chocolates, cookies, or candies: pretty much any little confection one could enjoy with coffee. As I said, they don’t often get much play in a lot of restaurants today (especially in the Boulder area), which is a shame, because it gives the diner an opportunity to experience a wider variety of flavors and textures than any single dessert can provide.

I decided to do a mignardise plate at Jianken, to change things up a little, and also to sneak in some shameless self-promotion. Besides, ever since I stumbled across this video on the interwebs, I have been looking for an excuse to make macarons.


Macarons are one o
f those quintessential French confections that are not given the credit they deserve in the American foodscape. While there’s some debate as to their origins, most people believe that the macaron came about sometime during the 16th century, most likely brought from Italy. In its simplest form, a macaron (note: one “o” not two. Macaroons are entirely different) is just almond flour, egg whites, and sugar, baked together. The ratio of sugar to almonds and sugar to egg whites will effect the end product; more sugar produces a chewier macaron, less makes a crispier one. I had never made a macaron prior to this, and ended up having to do a lot of research before I felt confident to try a batch of my own.

Black Sesame Macaron

Yield ~ 50

190g egg whites, at room temperature

250g sugar

100g water

40g black sesame powder

235g almond flower

230 confectioners sugar

1) Add egg whites to stand mixer with wisk attachment. Start on med-low speed.

2) In a saucepan, combine sugar and water, and cook to 240°f (soft ball stage)

3) Increase mixer speed to medium and slowly stream in the cooked sugar, trying to pour between the bowl and the wisk so as not to fling the sugar around the bowl

4) Whip until the meringue has cooled and forms still peaks

5) Sift together dry ingredients

6) In three stages, fold the meringue into the dry ingredients until homogenous

7) pipe 3cm circles onto parchment, allowing room for expansion

8) allow to dry for a minimum of 30 minutes at room temperature

9) bake at 400°f for 11 min, or until done.

10) cool, remove from parchment, and sandwich two together with about a teaspoon of yuzu curd

It took a couple attempts to get a batch that I was happy with. For having so few ingredients, macarons are tricky things to get right. I just need to do it a few thousand more time and I will be as good as the guy in the video.

As for the rest of the plate, I went with some old stand bys, just in case the macarons never turned out. Glazed caramel cake, earl grey and lavender bon bons, and peanut brittle. Classic.

Who knows. One of these days, I may even try my hand at entremets…


Saturday, January 9, 2010

Copycat


A lot of chefs seem to like to refer to the craft as an art. It’s a nice thought: something so simple and necessary as food turned into an expression of ones self and ones feelings. Nice, and yet for the most part, I disagree. While there certainly chefs who one could call artists, and for whom food is an expression of the soul, I like to think of us more as the marketing department. You know you need to eat, but our job is to convince you to eat (and generally pay) for the food we make for you. The refined plating and complexity are just a way to make our product stand out… like packaging.

Thinking of food as art does have its advantages, though, because it allows us to do something that a marketing VP generally cannot: Shamelessly steal ideas.

The first seeds of this dessert were planted when they had a chocolate savarin on the menu at D Bar. I remember trying to take the recipe back home to fiddle with it, but didn’t ever manage to get the texture right. It wasn’t until I found a similar recipe on the Callebaut website that I decided to give it another go.

The basic principle behind the Savarin Moelleux is a mousse that is slightly baked, both to give it [some] structural stability and to prevent any possibility of salmonella. What you get is a mousse that is firm enough to hold its shape, but is airy and light on the palate.

Savarin Moelleux adapted from Alexandre Bourdeaux

Yield: ~750g

100g butter

250g Dark Chocolate

100g egg yolks

225g egg whites

50g sugar

pinch salt

1) Combine butter and chocolate and melt

2) Whip egg whites on medium speed.

3) Slowly add sugar and salt into egg whites and whip to medium peaks

4) Add yolks to chocolate mixture and emulsify

5) Fold egg whites into chocolate mixture thoroughly.

6) Dispense into flexipans and freeze solid (about 4 hours).

7) Bake at 425° for 6-10 min, rotating once

8) Return to freezer and freeze solid (about 5 hours)

9) Unmold, and allow to thaw.


A couple caveats: Freezing the mix ensures that they won’t soufflé up during baking. If they begin to rise, they are most likely over baked. If you get impatient, and try to unmold them before they are completely frozen, you risk breaking the pieces.

With this as the center of the dish, the rest of the dessert just seemed to fall into place. I filled the well in the top of the savarin with a white chocolate and crème fraiche ganache. A quenelle of orange chocolate creameux, and a lacey chocolate tuile on top to add crunch.

Thinking of winter desserts, it is hard to ignore citrus fruits, which are coming into their peak right now. While at the store, I picked up a bag of clementines thinking that I would give them a try and see how they were. To my excitement, they were exactly how I like them. They were tart, but sweet, with little pith and a nice thin membrane. The acid would do wonders to cut the thick fats of the chocolate and cream.

After eating one or two (or five), I realized that if I didn’t do something with them soon, there wouldn’t be any left for the dessert. I took a gamble, and let the segmented clementines soak in strong brewed earl grey tea. Earl grey is fermented with bergamot, a variety of bitter orange, and so is the natural choice for citrus applications. After about four hours in the earl grey, I drained the segments and popped one into my mouth. The initial taste was very earl grey, but as I bit down discovered that the membrane of the celemetines had absorbed the earl grey, but it hadn’t penetrated into the rest of the fruit. The meat was still bright and clean. I’m so happy with this technique, I might always use it from now on. The other benefit of the soak is that it will prevent the segments from drying out over time.

Finally, I took the left over earl grey “marinade” and added it to about half its amount of orange juice and reduced it down to a sauce consistency.

Wednesday, January 6, 2010

Pear

Happy New Year! Again, it has been longer than I would like since my last past, and as a result, one of my resolutions is to pick back up the pace of my posts to at least once a week.

Note: For some reason, the pictures I took of this dessert seem to be missing. Instead of putting off posting, I decided to go ahead, and I will add the pictures in later.

I decided to celebrate the end of fall with a pear dessert since pears are really only worth eating in the fall. I have a bit of a love/hate relationship with pears. When they’re good, they’re great. It’s really easy, however, to get pears that are either too soft, or too mealy. My approach to the dessert was three different pears five different ways.

The focal point of the of the dessert is the sake poached bosc pear. Bosc pears are good for poaching because they don’t let go of their water as much as many other varieties, so they don’t shrink during the cooking process. I took a bit of a gamble by poaching them in sake as opposed to wine, because despite the fact that sake is called “rice wine,” the flavor it brings is far different. The result, happily, was a pear that kept its delicate flavor, while picking up some of the dryness of the sake.

For the second iteration of pear, I took the poaching liquid from the pears, reduced it down, and made a caramel out of it by adding some extra sugar, bringing it up to around 320°, and adding scalded cream and sake to make a complex caramel sauce that has a strong taste of sake and also a slight fruitiness that is distinctly pear.

The third variety of pear is a pear galette, which is simply puff pastry, topped with sliced pear, brushed with butter and sprinkled with sugar. When they bake, the pears –bartlet this time—wilt down a little bit, but keep all of their flavor. I chose bartlet pears for the galette because I think they have the fullest flavor, and are [fairly] consistent.

The fourth preparation for the pears is another taken from the pages of Keegan Gerhard: a sweet-and-sour roasted pear (though I don’t know if he would necessarily describe it that way). For this I used the little Forelle pears, which taste similar to a bartlet, but are only about a third the size, and made sure that they were a little on the hard side. I roasted them in palm sugar and butter in a 300ish oven, cored and skin on, but with a few slits poked in the sides, moving them around the pan every 20 minutes or so. After about an hour and a half, I added a sprinkle of yuzu juice, to add that distinct tartness.

The final style of pear is a simple pear chip (you will notice that it is missing in the picture). To make the chips, I took the left over Bartlett pears, sliced them very thinly, and lay them out on a silpat. They dry out in a low oven (150°) for 2-3 hours, and then are ready to go.

Of course, in keeping with my obsession over brown butter, the dessert wouldn’t be complete without the addition of a scoop of brown butter ice cream.